Getting Started & Feature Guide
Learn how to set up and use Stockroom Runner effectively.
- Install Stockroom Runner from the Shopify App Store.
- Open the app from your Shopify admin.
- Select your location.
- Select a date and press "Let's Work".
If you have sales within the selected date (or date range) from your location, you will see a list the product that has sold. From there you can pull information to help you select the right items that is needed bak on the sales floor, and mark it as pulled when it is restocked.
This image will help you understand each card better:
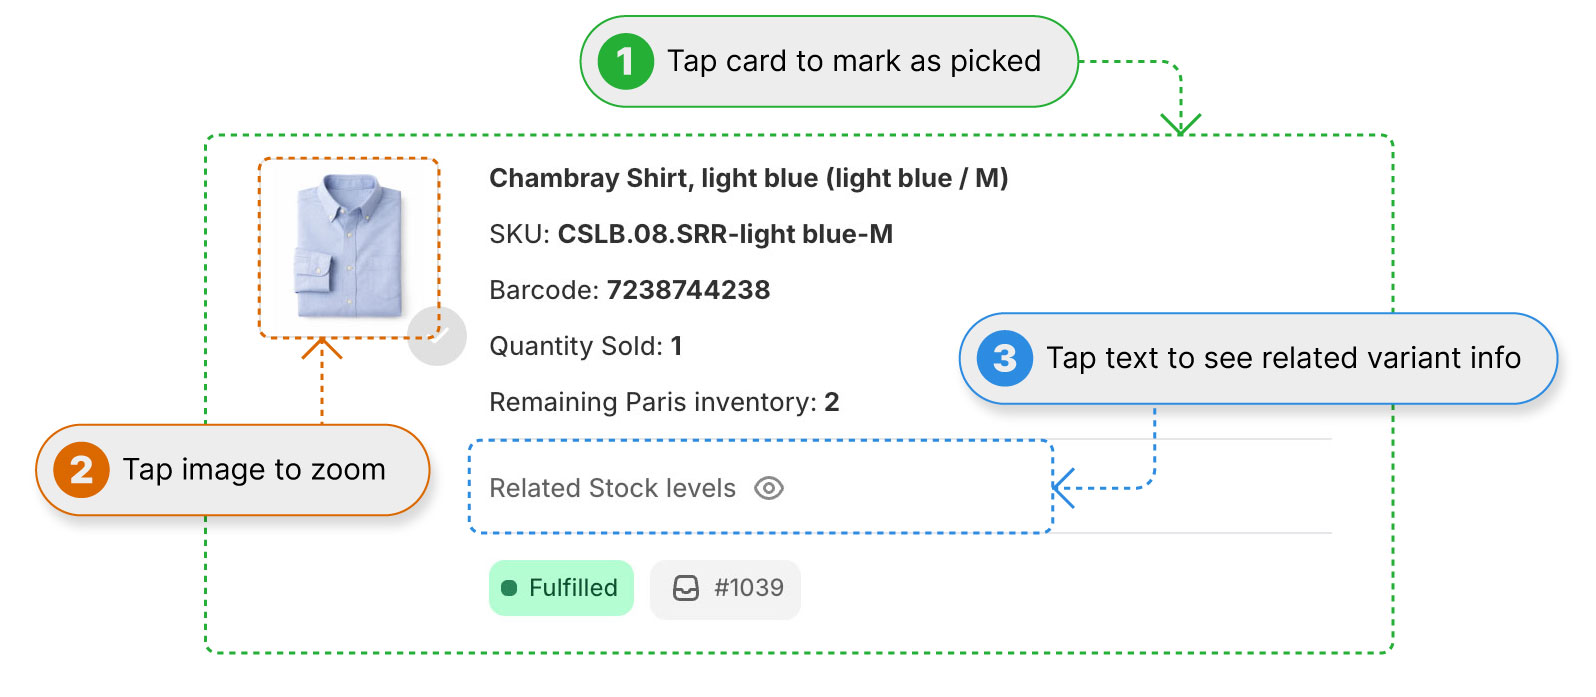
- Tap card to mark as picked
- Tap image to zoom
- Tap text to see related variants
Each card can be marked as pulled, and will show a green check at the bottom right of the product image and the card will be subdued. Items that are sold out in the variant are auto-marked. Images and related variants of marked cards can still be accessed. Once marked, a card remains marked across sessions, unless a newer sale of the item has occured in the selected date range.
You have the following viewing options with your list
- Change date or select a date range
- Change your location
- Filter by sales channel
- Sort by Date, Product Name, Inventory Level, Vendor Name and Check Status
Manually entered items are shown at the end of the list. These are shown to catch and correct any inventory discrepancies that can occur from manually entered sales.
In case of accidental marking, double click any card to unmark it.
In your preferences you can set your in-store display options, sort preference, display options and collection filtering for items you don't need in your list.
Finding Stockroom Runner
Once installed, here's where to find Stockroom Runner depending on how you access Shopify.
On Desktop (Shopify Admin)
- Log into your Shopify Admin.
- In the left-hand sidebar, click Apps.
- Find Stockroom Runner in your list of installed apps and click to open.
Tip: click the pin icon next to the app name to keep it at the top of your Apps list for quick access.
On Mobile (Shopify Admin app)
- Open the Shopify app on your phone.
- Tap the More (•••) menu in the bottom navigation.
- Tap Apps, then select Stockroom Runner from your list.
On POS (iPad/POS device)
- From the POS home screen, tap ... in the bottom navigation.
- Find Settings then select "All Apps"
- Find Stockroom Runner in the app list and tap to open.
To add it as a tile on your main POS screen for faster access:
- Tap "add Tile" on the home screen.
- Select "App", then choose Stockroom Runner and click "Add".
- Save your layout.
Frequently Asked Questions
How do I install Stockroom Runner?
Installation takes less than 5 minutes. Simply visit the Stockroom Runner page of the Shopify App Store, click "Add app", and follow the prompts to authorize the app.
Does my team need separate accounts?
No! All users with access to apps in your Shopify admin can use Stockroom Runner. Progress syncs automatically across all devices.
Can I see what was restocked on previous days?
Yes! Stockroom Runner keeps a complete history of all restocking activity, including who marked items and when, to a limit of 60 days before the current date.
What if I need to uninstall?
You can uninstall anytime directly from your Shopify admin. No long-term commitments required. Uninstallation can be initiated at the top right of Stockroom Runner's app (click the three dots and select uninstall)
Still Need Help?
Send us a message. We normally get back to you within one business day.